
How to Take PHP to the Next Level: Advanced Strategies for Building Exceptional Applications

Designing a Mini PHP Framework from Scratch: A Deep Dive
Why Build Your Own Framework?
Setting the Goals for Your Framework
Before writing any code, it’s essential to define the scope and features of your framework. A mini PHP framework typically includes:
- Routing System: A way to map URLs to specific controllers or functions.
- Request and Response Handling: A mechanism to manage incoming HTTP requests and send appropriate responses.
- Middleware Support: A layer to process requests and responses before they reach controllers.
- Basic ORM (Object-Relational Mapping): For simplified database interactions.
- Extensibility: The ability to add or modify components without breaking the core system.
Once you have a clear vision, it’s time to start coding.
Step 1: Building the Routing System
The routing system is the backbone of your framework. It determines how HTTP requests are matched to specific code blocks or controllers. A basic implementation can use regular expressions to parse URLs and map them to handlers.
Here’s a simple example:

How It Works:
- The
addRoutemethod registers new routes by storing them in an array. - The
dispatchmethod loops through all routes, matching the HTTP method and URL using a regular expression. - If a match is found, the associated handler (a function or method) is executed.
Step 2: Handling Requests and Responses
To manage HTTP interactions cleanly, create classes for requests and responses. This abstraction separates input (request) from output (response), making your code more maintainable.
Example Request Class:

Example Response Class:

These classes encapsulate HTTP data, allowing your controllers to focus solely on business logic.
Step 3: Adding Middleware
Middleware is an essential feature for modern frameworks. It allows developers to process requests (e.g., authentication checks) or modify responses (e.g., adding headers) before they reach the core logic.
Here’s how to integrate middleware:

You can then use this middleware system for tasks like logging, caching, or user authentication.
Step 4: Integrating Database Support with ORM
A lightweight ORM simplifies database operations by abstracting SQL queries into object-oriented methods. Here’s a basic implementation:

This ORM allows you to interact with the database using simple methods:

Step 5: Organizing the Framework
To keep your framework maintainable, structure your project like this:

index.php).Final Thoughts
Building a mini PHP framework is a fantastic learning experience that enhances your understanding of web development principles. By mastering concepts like routing, request handling, middleware, and ORM, you’ll not only gain deeper insights into PHP but also create a practical tool tailored to your projects. Whether you use it as a foundation for future applications or as a learning exercise, the skills you acquire will be invaluable in your development journey.
Building a Dynamic Module System in PHP: A Comprehensive Guide

The Concept of Modules in Programming
Modules refer to breaking down a project into independent, reusable components. Each module contains a set of files and responsibilities that serve a specific purpose. For example, in a content management system (CMS), you might have modules for user management, article management, and reporting. The goal is to separate tasks so that you can add, modify, or remove any module without making significant changes to the core system.
Building a Dynamic Module System
To design a system that dynamically supports adding or removing modules, the following key aspects should be considered:
1. Project Structure
Start by defining a project architecture that facilitates easy module management. For instance:

In this structure, each module is placed in a separate folder containing its essential components, such as controllers, models, and views. The module.php file serves as the main entry point to define and connect the module with the core system.
2. Using Autoloading
To avoid manually loading all files, you can use an autoloader. If you're using Composer, configure the autoload settings in the composer.json file:

After setting up the autoloader, you can load all modules automatically with:

3. Loading and Registering Modules
To activate modules, there should be a system that automatically scans and loads them. For example, you can write code to scan the modules directory for new modules:

With this approach, any new module added to the modules directory will be loaded automatically without modifying the core code.
4. Designing a Unified Module API
To ensure compatibility between different modules, it’s a good practice to define a standard API. This can be achieved using interfaces or base classes:

This ensures that all modules have a consistent structure and behave in the same way.
Practical Example: A Blog Module
Let’s assume you want to create a module for blog management. Here’s how you can approach it:
Create the Module Folder:

Define the Module in the module.php file:

Add Specific Code for managing articles inside the respective directories.
When the system runs, the core code will automatically load and activate the module.
Benefits of This System
- Scalability: You can add new modules without making significant changes to the system.
- Reusability: Modules can be reused across multiple projects.
- Ease of Maintenance: Separating tasks into independent modules makes it easier to identify and fix issues.
In conclusion, designing a dynamic module system in PHP ensures that your projects are organized and professional, making them easier to work on whether you’re working alone or as part of a team.
Applying the Concept of Dependency Injection (DI) in PHP Projects: Enhancing Code Organization and Flexibility
When designing large-scale software systems, managing dependencies between components becomes a significant challenge. Dependency Injection (DI) is a fundamental principle in software design that aims to reduce coupling between components, making code more flexible and scalable.
DI revolves around the concept of passing the objects a class requires rather than letting the class create them itself. This approach simplifies code testing (unit testing) and improves readability and organization. For instance, instead of creating a database connection within each class, it can be passed into the class via DI, making the code reusable across various contexts.
Types of Dependency Injection
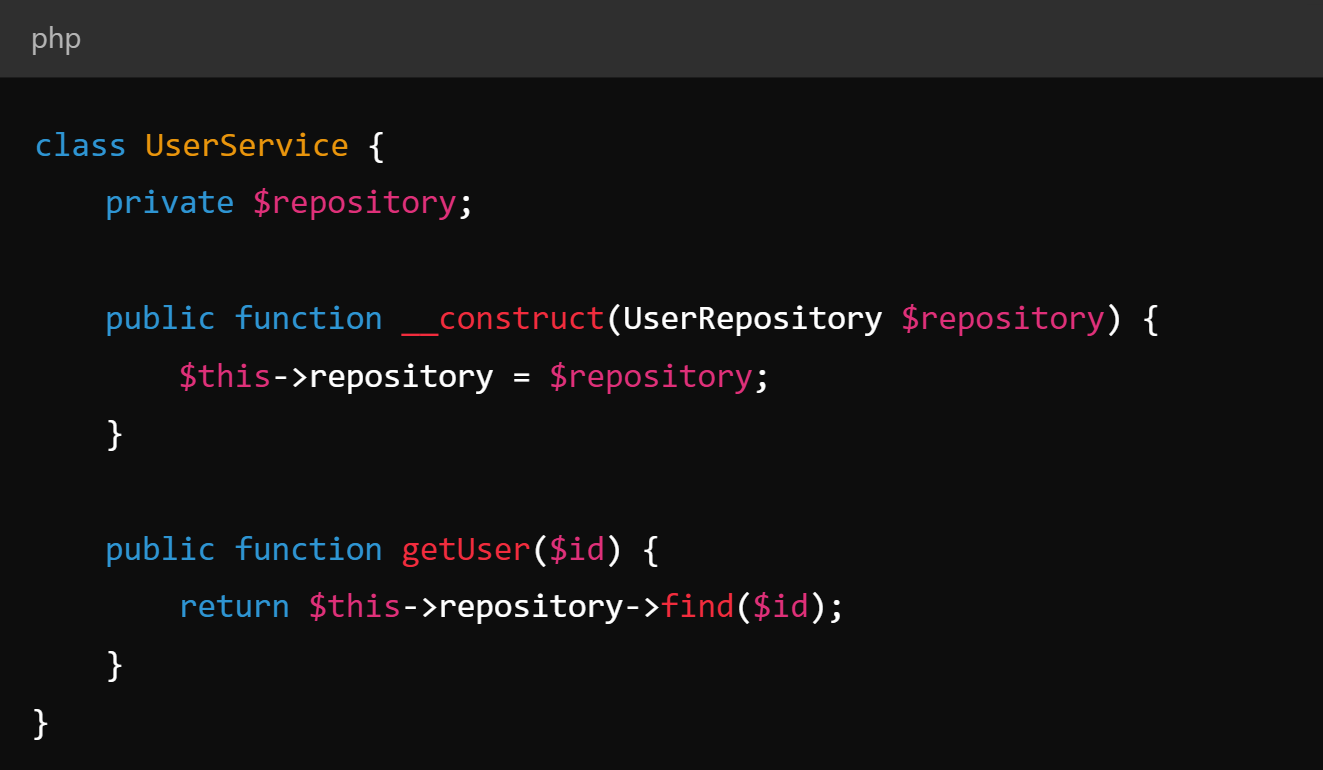
1. Constructor Injection
Dependencies are passed to the class through its constructor.
Advantages:
- Ideal for defining required dependencies at the time of object creation.
- Ensures all dependencies are available during initialization.
Example:
2. Setter Injection
Dependencies are passed to the class via setter methods.
Advantages:
- Provides greater flexibility to modify dependencies after object creation.
Disadvantages: - The code may be prone to errors if a dependency is not set.
Example:

3. Interface Injection
Dependencies are enforced by requiring classes to implement interfaces that define the dependencies.
Advantages:
- Makes the code more structured and extensible.
Disadvantages: - Can be more complex compared to other methods.
Example:

Building a Dependency Injection Container
A Service Container is a component used to manage dependencies between objects in a project. It allows you to register services, store them, and reuse them efficiently.
Designing a Simple Service Container
- Defining the Container:
- An array is used to store services and their instances.

- Registering and Reusing Services:
Objects or functions can be registered to recreate services on demand.
Practical Application of DI
Without a Framework

With a Framework Like Laravel
Laravel provides a built-in DI container for easy dependency management. You can use bind or singleton to register services.

Comparison Between DI with and Without Framework
Without a Framework:
You need to design the DI system manually, providing complete control but taking more time.
With a Framework like Laravel:
Saves time due to ready-made tools but requires a deep understanding of the container system.
In summary, Dependency Injection is a cornerstone for developing clean and scalable software. Using containers to manage dependencies enhances project quality and provides flexibility for future development.
Without a Framework:
You need to design the DI system manually, providing complete control but taking more time.
With a Framework like Laravel:
Saves time due to ready-made tools but requires a deep understanding of the container system.
Implementing the Concept of Dependency Injection (DI) in PHP Projects: A Step Toward Clean Programming
Introduction: Why is Dependency Injection (DI) Essential?
In the world of software development, one of the primary challenges is ensuring that code is flexible, maintainable, and testable. When building applications, you often find that components are highly dependent on each other, leading to complex and hard-to-manage code. This is where Dependency Injection (DI) comes into play, offering a way to decouple dependencies between components, reducing code entanglement, and improving reusability.
DI operates on the idea that objects do not create their required dependencies internally but instead have them "injected" from the outside. This allows for easy changes to dependencies without affecting other components. Furthermore, DI simplifies unit testing, enabling the use of mock objects in place of real dependencies during tests.
Types of Dependency Injection

Constructor Injection
This method involves passing the required dependencies to the object during its creation via the constructor.
Advantages:
- Makes dependencies explicit during object creation.
- Ensures that all dependencies are available immediately upon object instantiation.
Example:

Setter Injection
Here, dependencies are provided to the object via setter methods.
Advantages:
- Provides flexibility in modifying dependencies after object creation.
- Disadvantages:
- May lead to errors if dependencies are not set before the object is used.
Example:

Interface Injection
In this method, objects implement specific interfaces containing the required dependencies.
Advantages:
- Provides a more organized and extensible structure.
Disadvantages:
- Can increase code complexity.
Example:

Constructor Injection
This method involves passing the required dependencies to the object during its creation via the constructor.Advantages:
- Makes dependencies explicit during object creation.
- Ensures that all dependencies are available immediately upon object instantiation.
Example:

Setter Injection
Here, dependencies are provided to the object via setter methods.Advantages:
- Provides flexibility in modifying dependencies after object creation.
- Disadvantages:
- May lead to errors if dependencies are not set before the object is used.
Example:

Interface Injection
In this method, objects implement specific interfaces containing the required dependencies.Advantages:
- Provides a more organized and extensible structure.
Disadvantages:
- Can increase code complexity.
Example:

Creating a Service Container for DI Management
A Service Container is a tool used to manage dependencies between objects in an application. Think of the container as a place where services are registered and can be called when needed.
Steps to Build a Service Container
Define the Container
The container stores and manages services and their reuse.

Register Services
Dynamically register services within the container.
Define the Container
The container stores and manages services and their reuse.
Register Services
Dynamically register services within the container.
Practical Application
Without Using a Framework
You can manually implement DI by passing required dependencies to each object:


Using a Framework like Laravel
In Laravel, an in-built DI container simplifies dependency management:


Comparing DI With and Without Frameworks
Without Frameworks:
- Provides full control but requires more time to design the container and manually register services.
With Frameworks:
- Offers ready-made tools, speeding up development but requiring a deeper understanding of the container.
In conclusion, Dependency Injection is not just a technical concept but a cornerstone for developing clean, scalable, and maintainable software. By adopting DI in PHP projects, developers can elevate the quality of their applications and ensure long-term flexibility to adapt to future changes with ease.Designing Event-Driven Architecture in PHP: A Deep Dive

Without Frameworks:
- Provides full control but requires more time to design the container and manually register services.
With Frameworks:
- Offers ready-made tools, speeding up development but requiring a deeper understanding of the container.

Introduction: What is Event-Driven Architecture, and Why is it Used?
Event-Driven Architecture (EDA) is a software design paradigm that revolves around the production, detection, and reaction to events. An "event" in this context represents a significant occurrence within the system, such as a user registering, a file being uploaded, or a payment being processed. The key idea is to decouple components in the system by having them communicate through events, promoting scalability, flexibility, and maintainability. Instead of tightly coupling components, EDA enables the system to respond dynamically to events in a loosely coupled manner, making it easier to add or modify features without overhauling the entire architecture.
EDA is particularly useful in modern applications where asynchronous workflows, real-time processing, or integration with external systems are required. For example, in a user registration process, EDA allows the system to trigger multiple actions (e.g., sending a welcome email, logging the registration, and updating analytics) without these components being directly aware of each other.
Event Dispatcher: The Core of Event-Driven Architecture
The heart of any Event-Driven Architecture is the Event Dispatcher, a mechanism responsible for registering, dispatching, and managing events and their associated listeners.
- Creating a Simple Event Dispatcher
- Creating a Simple Event Dispatcher
A basic Event Dispatcher in PHP involves three main parts:
- Registering events: Defining events and the corresponding listeners.
- Dispatching events: Triggering an event when an action occurs.
- Executing listeners: Calling the appropriate listeners to respond to the event.
Here’s an example of a simple Event Dispatcher implementation:

- Building and Executing Listeners
Listeners are functions or classes designed to handle specific events. For example:

When the user.registered event is dispatched, all registered listeners are executed in sequence.
Practical Application: Event-Driven Notification System
Let’s design a simple notification system using EDA. Consider a scenario where a new user registers, and the system needs to send a welcome email and log the registration activity.
- Define the Event and Listener
The UserRegisteredEvent can be a class carrying user data, and we can define listeners to handle the email and logging tasks:

- Integrate the Dispatcher

- Define the Event and Listener

- Integrate the Dispatcher

Scaling with RabbitMQ or Redis
For large-scale applications, an in-memory or message-queue-based system like RabbitMQ or Redis can be integrated to handle events asynchronously across distributed systems.
- Using RabbitMQ
RabbitMQ allows events to be published to a queue and processed by consumers independently. For example:- The application publishes a
user.registeredevent to the queue.
- Multiple consumers (e.g., email service, logging service) subscribe to the queue and process the event asynchronously.
- Using Redis
Redis Pub/Sub functionality enables event broadcasting in real time:- Publishers send an event to a Redis channel.
- Subscribers listen to the channel and react to the event.
Conclusion
Event-Driven Architecture provides a powerful framework for building flexible and scalable PHP applications. By decoupling components, leveraging an Event Dispatcher, and integrating tools like RabbitMQ or Redis, developers can design systems that are modular, testable, and capable of handling complex workflows. This architecture not only improves the development experience but also enhances the end-user experience through responsive and efficient systems. Whether for small-scale projects or enterprise-level applications, EDA is a valuable approach that addresses the challenges of modern software development.
Other advanced ideas for advanced developers
1. Building an Expandable Plugin System
The ability to add plugins in a flexible and scalable manner is one of the most important practices for large applications that need multiple features without requiring constant changes to the core code. The basic idea is to design the system so that new components can be added independently without significantly affecting the overall performance of the application.
How to Design the System
To build a plugin system, you first need to have an organized folder structure within the project, where each plugin has its own folder containing its main file, which can be loaded when needed. The plugin should include a config.json file that stores settings such as the plugin name, version, and description. This file also includes paths to the plugin files and the functions that can be enabled.
An effective way to load the plugin dynamically is by using autoloading in PHP. You can use spl_autoload_register() to specify how the code should be automatically loaded, making the system capable of loading plugins without manual intervention. When the application starts, it reads the config.json file to load any declared plugins.
How to Activate Plugins When Needed
Once the plugin is loaded, the application should handle activating the plugin based on events or specific needs. For instance, you might want to load a plugin that sends notifications only when an error occurs or load a data analysis plugin in the background. This approach enhances scalability without impacting performance.
Additionally, you can also allow developers to add custom features through interfaces, enabling them to implement custom functionality in the plugin rather than relying solely on pre-written code.
2. Professional Error Handling
Error handling is an essential aspect of any professional application. When dealing with large and complex applications, errors may occur that are hard to detect or diagnose unless there is a dedicated and professional error handling layer in place.
How to Build a Custom Error Handling Layer
In PHP, you can build a custom error handling layer using built-in functions like set_error_handler() and set_exception_handler(), which allow you to define how to handle uncaught errors. These functions allow you to customize how errors are displayed, or suppress them entirely in production environments while logging them for later review.
For example, in a production environment, you may want to suppress error display to the end user but log every error to a file or database for later investigation. This strategy is ideal because it ensures the application's stability while keeping error details available when needed.
Logging Errors Using Monolog or Sentry
To extend error handling capabilities, you can use external libraries like Monolog and Sentry. Monolog is a powerful library used for logging errors in PHP applications, allowing you to configure it to log errors in text files, databases, or send alerts to services like Slack or Email. Monolog can be customized to log errors at different levels: from critical errors to regular information, helping you prioritize the most important issues.
On the other hand, Sentry is a real-time error monitoring tool, which means you'll be able to know about errors as they happen and pinpoint their exact location. With Sentry, you can also track performance reports and analyze data about errors and user interactions.
3. Code Improvement Using SOLID Principles
SOLID principles are a set of design principles that aim to improve code quality, making it more flexible and maintainable. By applying these principles to your project, you can avoid many issues that may arise in large projects.
Explaining the SOLID Principles
Single Responsibility Principle (SRP): This principle states that each class should have only one responsibility. For example, if you have a class for handling users and another for handling orders, their responsibilities should not overlap. Each class should be responsible for one specific aspect of business logic.
Open/Closed Principle (OCP): This principle means that code should be open for extension but closed for modification. In other words, you should be able to add new features to the application without modifying the core code. This can be achieved through inheritance or interfaces.
Liskov Substitution Principle (LSP): This principle states that objects of a derived class should be able to replace objects of the base class without causing errors in the system. For instance, if you have a
Shapeclass and derived classes likeCircleandRectangle, you should be able to substitute any object from these classes without any issues.Interface Segregation Principle (ISP): This principle advises that large interfaces should be broken down into smaller, more specific ones. Instead of having a single
Printableinterface containing all functions related to printing, you can divide it into multiple interfaces likePrintableandScannable.Dependency Inversion Principle (DIP): This principle suggests that objects should depend on abstractions (interfaces or abstract classes) rather than concrete implementations. This ensures that the application can scale easily without being affected when the implementation details change.
Applying These Principles in PHP
You can apply these principles in PHP using techniques like interfaces, abstract classes, and frameworks like Laravel or Symfony that ensure these principles are implemented professionally.
4. Designing a Custom Logging System
A logging system is essential for tracking all activities in the application. It provides valuable information about errors, user interactions, and even the overall performance of the application.
Designing a Custom Logging System
A custom logging system allows you to customize how activities are logged. You can use libraries like Monolog to store logs in text files, databases, or even send logs to external platforms. Logs can include details such as error types, time of occurrence, location, and related data.
Through Logging Levels, you can classify logs between critical errors, warnings, informational messages, and routine events. This allows you to filter logs and analyze activities based on their importance.
Extending the Logging System
You can also integrate the logging system with other monitoring tools like New Relic or Datadog to provide additional details about application performance. This will help you identify peak times and monitor any unusual activities that may occur.
Conclusion
These advanced ideas form the foundation for building strong and scalable PHP applications. By implementing these concepts thoroughly, you can improve code maintainability, increase security, and enhance the user experience significantly.